Pages

Monday, October 31, 2011

Life Drawing: Form, Volume and Anatomy

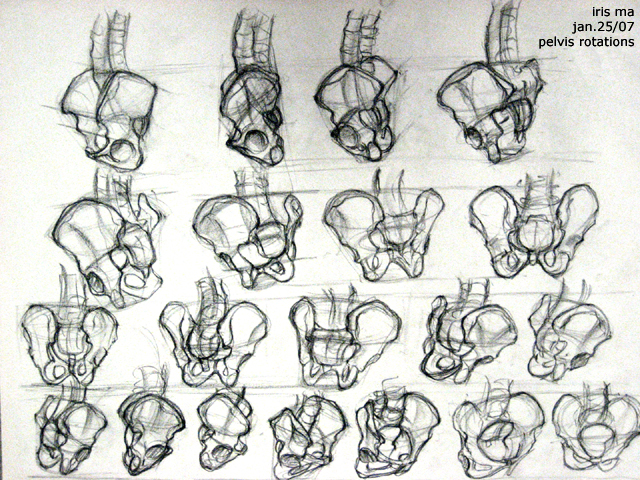
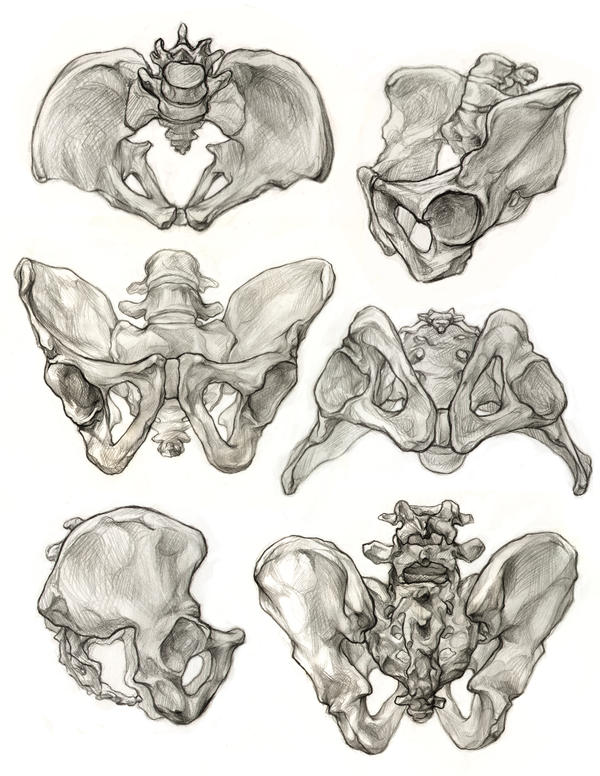
This week in class we'll be reviewing the pelvis as well as introducing the shoulder girdle. It is important to understand the human shape and form.  Combining your knowledge of anatomy and what you see (the model) to complete your drawings will make them more believable, accurate and make you a faster animator. I hope that you are starting to see changes in your drawings and your skill.   Think about what lessons we have learned up to this point.  Break it down into simple steps.  You may only get to one or two steps on shorter poses.  Maybe you'll go through all the elements on longer poses.  Learn to draw with focus on breaking the big task down into small steps.

Line of Action: An imaginary line extending through the main action of the figure. Plan your figure and it's details to accentuate this line. By doing this you strengthen the dramatic effect. The first thing to draw when constructing a figure is the line of action- then build over it. [source]

Flow or Stick Figure:  Using the natural rhythms of the human form to describe the push and pull.


Balance: Hips and Shoulders moving like an accordion.

Proportion:  Take a moment to look at the drawing as a whole.  Apply what you know is true based on proportions of the human form: 
Figure = 7.5 or 8 heads high
pubic bone = 1/2 way point
hands = 1 head 
When the arms are at the side, the wrist bone aligns with the groin area.
The elbow aligns with belly button

**One of the MOST common newbie mistakes is to make the head too big for the body. Especially common is to make the legs too short.  It is almost inevitable that newbie artists do this. But it happens all the time, and we just don't seem to notice it when we are doing it. Measure and check these proportions!  Do it before you put any dark lines down on the drawing, so that any errors will be easier to fix.

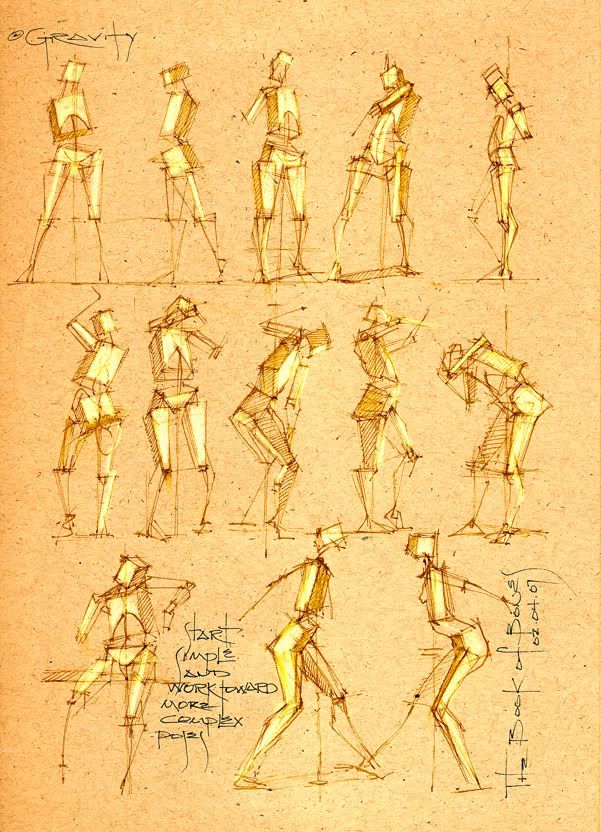
[source]
Weight:  Drop a plum line from base of neck or nose. Does this point line up with the grounded foot/feet? 


[source]
Boxes and Cylinders: These help us to see and describe the planes of the figure.  It helps us describe the form and volume three dimensionally. They also help to simplify where the light will hit on the surface of the figure.
[source]

Line Quality: Effective use of soft and bold lines to create depth and weight. If you draw with the same pressure, the line will flatten out your drawing. Use stronger lines on the underside of your figure to help describe weight.  Generally speaking, darker lines will come towards the viewer as lighter ones recede   Be aware of the contrast in your line work.


Assignment #2 Shoulder Girdle Studies - due Nov 22nd
Please submit your drawings in 8.5 x 11 .jpg format and email to tblair007@gmail.com


3 views of the scapula, front, profile and back.

2 views of entire shoulder girdle, sternum and clavicle (front and back)


Sunday, October 23, 2011

"To an overwhelmingly apathetic culture: If you're not passionate about something... anything... what's the point?" - Johanna Westby

Monday, October 17, 2011

3rd Year Design: Television vs Feature Quality BG's

In production there are very economical reasons for doing things the way they are done.  I find it can be completely frustrating when an employer has expectations of their staff to do feature quality work on a television production budget.  Simply put, just comparing backgrounds in television vs. feature, the difference is obvious.

Television needs to be done in clever, quick, appealing ways.  The technique often tends to be more graphic in nature.  Generally, more line art is used in television.

Looney Toones
Paul Bunyan
Samurai Jack
Fairly Odd Parents

Feature requires a little more time and skill. These artists are responsible for the creation of complex backgrounds, landscapes and environments. They require a high skill level in painting, composition, perspective and color.
101 Dalmations
Bambi
Beauty and the Beast
The Little Mermaid
Enchanted
The Lion King
Onto Painting.... I am loving Marco Bucci right now.  He's a hugely talented painter and although I heard a few sighs of "as if I can do that" last time I showed a tutorial from him in class, I think his methods are very simple and straight forward.  I like in this video how he breaks down his process:
Blocking in abstract shapes and values at first.  
Make sure the painting works and reads in the first 5-10 minutes.  
Working with colour temperature, cool and warm colours to create contrast - this will draw your eye 

Friendly Fire

Here's an old class pic of my class at Sheridan.  I'm on the right in the baby blue hoodie!  
Everyone needs a little healthy competition in their lives.  Here's a link to our sister school, Sheridan College!  These are our future colleagues & friends.  Check out their blogs and be inspired!  And please if anyone wants to share their own link with me I will add it onto our blogsite!

http://sheridananimation.blogspot.com/

Passion and Drive

There's much grey area when it comes down to artwork and quality.   Something that is well executed in the opinion of one person might be less so to another.  We as artists need to be very self aware.  I very much believe that we are always growing and learning as artists.  We learn from the people we study with.  We learn from the people we study to become.  We learn from life and our physical environment.  Inspiration and influence is everywhere.  It's in the music we love.  It's in the movies we watch over and over again.  It's in every changing season, on vacation with us and in the architecture of the buildings we pass by.  It's the passion that we have as artists that give us the open eyes to see all this glorious inspiration in our lives.

Without passion, a hundred year old weeping willow is just a tree.  


Without passion, the Notre Dame Cathedral is just a church.


Without passion, Glen Keane is just some dude who draws cartoons.

My question to you is what do you see?


Life Drawing: Some Gestures from the Week.

To create the illusion of depth draw on your knowledge of perspective.  You could help yourself in this type of pose by drawing a box in perspective representing the simple shape that the figure would be contained in.  Marking down the ground plane to weigh down your model and keep him planted.  In this pose, we also have overlapping forms (arms in front of torso, in front of legs) which further helps in creating depth or foreshortening.
You can slightly see my Line of action here in my light underdrawing.  It goes up the arm, down the back and swoops over the hips and down the leg. 


This is an easy line of action here(yellow line).  Figure is properly balanced.  You can see that if you drop a line straight down from the base of his neck, his weight is evenly distributed between both feet.

Woah, can you see the boxes?  I tend to shade two sides of my boxes, especially if that side of the box is in shadow(pelvis).  Simplifies my gestures in quick poses but adds form.  Notice the back of the knee caps showing the perspective/surface line in one stroke.  You can tell that the Left leg is coming towards us, Right leg is angled away.

Left figure is balanced.  Right figure showing form through boxes and a long line of action reaching up.
Can you feel the flow and rhythm of this drawing?

Boxes forming the ribcage and pelvis + flow down legs + balance and proportion = simple clean gesture 


Life Drawing: Portfolio #1

Portfolio #1 Figure Drawing - Due Nov 8th
(30% of final grade)


This is going to be an important assignment for this class.  It's the first of many portfolios that will be submitted in the next 3 years of animation.  Collect the best drawings from each class and from the drawing circle.  Keep a variety of drawings (30sec, 1 min, 3 mins, 5 mins)  Ongoing assessment will be available to each student during or after class.  I encourage students to approach me with their drawings before the due date to help accurately inform and assess students on their strengths and weaknesses.  Remember Life drawing is about building your skills up for animation.  Drawing from life will build the artillery of poses and gestures to apply to your imagination!

Delivery:
Bristol board -Left side and Bottom taped closed.  Top and Right side open.
Upper right corner- name, printed
Each drawing- On newsprint and in Conte, Willow stick or Nupastel.  Name, time in bottom right corner of each drawing.
Drawings submitted in Pencil will not be marked for grade.

Each portfolio will be made up of 10 pages of drawings for final submission:
2 x 30 seconds
2 x 1 minute
2 x 3 minute
2 x 5 minute
2 x students choice

Monday, October 10, 2011

Life Drawing: Gestures

Rembrandt shows us how it's done

Life Drawing: Tis the season for Bone Studies

Studying the skeleton and knowing it's proportions, joints and form is fundamental to life drawing.  Life drawing is fundamental to animation.  The Pelvis is the most complicated bone in the human body.  It's not an easy task to simplify the pelvis.  It is one of those things that takes practice drawing over and over to commit to memory.  
[source]
"Essentially you can see it as two plates at angles to each other - the illiac masses - connected at the back by the spine and at the front by the pubis bones. You can visualize it as a box within the body, or as a sort of butterfly shape. You can think of the pelvis as the keystone that bridges the legs and supports and balances the spine above - you can also think of it as a basket that holds the guts and sex organs. It expresses itself on the outer form subtly, as arcs that curve down towards the groin in the front. Huge bunches of leg muscles attach themselves to the iliac ridge from below, and the abdominal and oblique muscles from above." [source]

Due next week.  10 Pelvis studies from the skeleton in the studio (not from text book)
Below are some examples of studies done by other animation students:

[source]

[source]


[source]


Sunday, October 9, 2011

3rd Year Design: For Katherine and Britney

Last week we looked at Model Sheets.  

Character Lineup
Character Rotation
Pose Sheet
Structure and Character Breakdown
This week we will begin to put into motion our characters.  It's not enough to simply design a character.  The character needs to be thoroughly practiced and posed.  Fine tune your character and alter it if you need to, until it's comfortable to animate.  IN DETAIL describe how  to approach this character in animation.  If you were working at a studio, this would all need to be clear on paper prior to production.  It makes more sense to give the animation team as much information possible before they animate, rather than try to explain it during animation or the revision stage.  Time is money, and you will surely learn that as an animator, you want to have as much information as possible  from the start.  Too often, I see unnecessary revisions after scenes have been fully animated.  Something as simple as a detailed model sheet could have been enough to prevent such set backs.  Plan, plan plan.

Below are some wonderful drawings from Hans Bacher's blog.   Designed by CHEN-YI CHANG for Disney's Mulan.
© disney enterprises, inc
Your end goal is to have many industry standard portfolio pieces as possible.  Keep asking yourself, can I animate these characters?  Are they esthetically appealing?  How do the forms move in 3 dementional space?
Here's a beautiful piece of animation I found while looking through the 11 Second Club.  The short film was originally created by BJ Crawford for his 3rd year film.  He says he recently finished it up in collaboration with many talented animators and artists.  It's never too late!  Feel how the characters move.  They seem 3 dementional!
[source]
[source]